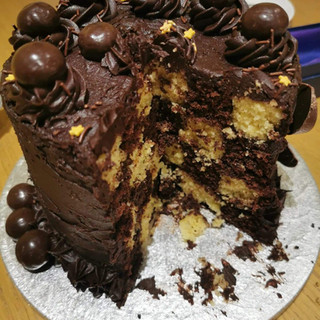
How to create a chequer board cake
- katekerly
- Jun 5, 2022
- 2 min read
I've now made three chequer board cakes, all with different colours. I thought I would share my experience and explain how I made these cakes.
These are the three cakes I have made:
As you can see, I have come a long way from my first attempt! What I learnt from that one was that the cake needed to be sturdier than a regular sponge cake. Otherwise when you cut into it, it just crumbles and you lose the chequer effect.
My next attempt was much better, so when I went on to the third one I was a bit more experimental and went with three colours.
How to make the cake
This makes a 6inch cake with three layers. You need three 6inch tins or as I did bake in slightly larger tins then trim to size when baked.
Ingredients
8oz margarine
8oz sugar
10oz self raising flour
4 eggs
Food colour of choice
Vanilla extract or other flavour
Method
Pre heat the oven to 180oC
Grease three 6inch tins
Cream margarine and sugar until light and fluffy
Add in eggs one at a time
Stir in flavouring
Mix in flour gently
Divide mixture between three bowls if using three colours, or if doing two colours put 1/3 in one bowl and 2/3 in the other
Add in food colour to each bowl until the desired colour is reached
Pour into the baking tins and bake for 15-20 minutes until a tooth pick comes out clean
Leave to cool
Trim cakes so they are even and the correct size (6inches)
Cutting the cakes to make the checkerboard effect
You will need cookie cutters in sizes 2inch and 4inches. Mine came from a pastry cutter set I've had for years
The tricky part - you need to lay the cutters on each cake so they are evenly spaced. Use a ruler or tape measure if needed. Once happy gently press the cutters in the cake and cut out the pieces. Be gentle or the cakes can break.
Once all the pieces are cut you need to arrange the cakes so that the colors alternate. Use jam to stick the cakes together. Don't use buttercream or the chequer effect will be lost.
It should look something like this but with three layers only:

When you are happy you can now decorate it as you wish. I usually crumb coat with buttercream, chill the cake then put on a final layer after.
The original recipe came from a vintage Stork cook booklet called 'cooking for compliments'


It makes a slightly larger cake but the principle is the same.
The cake I made in red, white and blue was for the Queen's Jubilee celebration. My pattern worked out but if I was to do it again, I would alter the arrangement of the colours so they were more evenly spread out. However I am very happy with this cake and think it is my best chequer effect. The colours are vibrant and the cake cut well.
I hope this has inspired you to have a go at a chequer board cake, and that you can see it is actually fairly simple to create.


Comments